This step by step diy woodworking project is about how to build a home bar. If you want to learn more about building a basic bar for home or kitchen, we recommend you to pay attention to the instructions described in the article. Work with good judgement and take a close look over the alternatives, as there are many plan sand designs to choose from when building a bar for your home.
Work with attention and don’t forget that a good planning will save you from many issues and it will keep the costs withing the total budget. Invest in high quality materials, such as pine, redwood or cedar. Drill pocket holes before inserting the galvanized screws, to prevent the wood from splitting. Add waterproof glue t the joints, in order to enhance the rigidity of the structure. See all my Premium Plans HERE.
Projects made from these plans
How to Build a Home Bar
Building-a-home-bar
Cut & Shopping Lists
- A – 2 pieces of 2×4 lumber – 48″ long, 3 pieces – 15″ long 2xFRAME
- B – 4 pieces of 2×4 lumber – 40″ long, 4 pieces of 2×6 lumber – 40″ long LEGS
- C – 6 pieces of 1×4 lumber – 11″ long, 6 pieces – 41″ long, 2 pieces – 13 3/4″ long TRIMS
- D – 2 pieces of 3/4″ plywood – 11″x38″ long, 1 piece – 41″x38″ long PANELS
- E – 2 pieces of 3/4″ plywood – 51″x21″ long, 2 pieces of 2×4 lumber – 54″ long, 2 pieces – 24″ long TABLETOP
- F – 2 pieces of 3/4″ plywood – 18″x48″ long, 2 pieces of 1×2 lumber – 18″ long SHELVES
- G – 1 piece of 1×2 lumber – 41″ long, 1 piece of 1×6 lumber – 41″ long TRIMS
- 7 pieces of 2×4 lumber – 8 ft
- 2 pieces of 2×6 lumber – 8 ft
- 4 pieces of 1×4 lumber – 8 ft
- 2 pieces of 3/4″ plywood – 4’x8′
- 1 piece of 1×2 lumber – 10 ft
- 1 piece of 1×4 lumber – 4 ft
- 1 1/4″ screws
- 1 5/8″ screws
- 2 1/2″ screws
- filler, stain
- glue
Tools
![]() Hammer, Tape measure, Framing square, Level
Hammer, Tape measure, Framing square, Level
![]() Miter saw, Drill machinery, Screwdriver, Sander
Miter saw, Drill machinery, Screwdriver, Sander
![]() Post hole digger, Concrete mixer
Post hole digger, Concrete mixer
Time
![]() One day
One day
Related
Check out this video tutorial! It’s that easy to build your own home bar!
[youtube id=”A0TiEADoC9s” width=”600″ height=”350″]
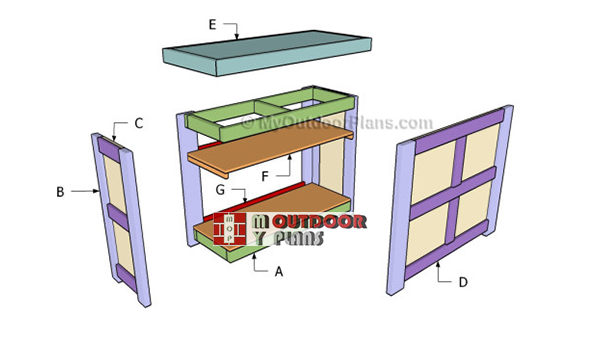
Building a home bar
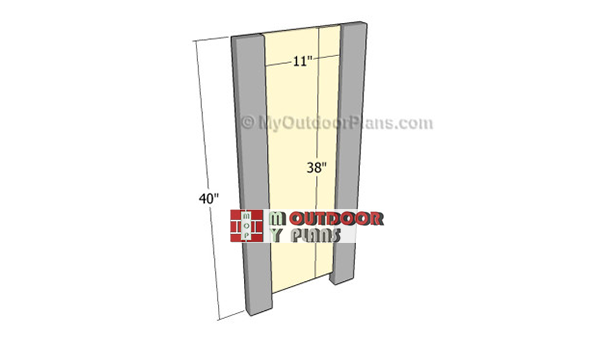
Building-the-sides
The first step of the woodworking project is to build the sides of the home bar. In order to get a professional result, we recommend you to build the legs out of 2×4 lumber and the panel out of 3/4″ plywood.
Drill pocket holes along the side edges of the panel and secure it to the legs using 1 1/4″ screws. Add waterproof glue to the edges and remove the excess using a damp cloth.
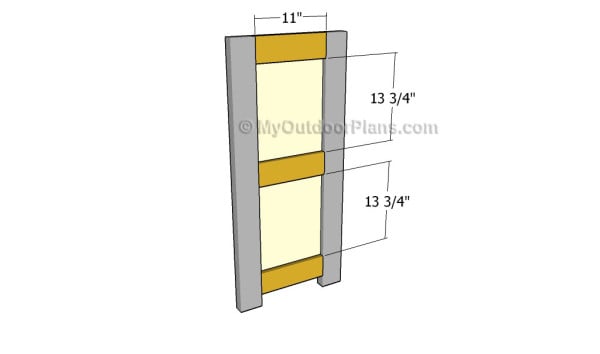
Fitting the side trims
In order to get the job done in a professional manner, we recommend you to attach decorative trims to the side panels. Build the trims out of 1×4 lumber and secure them to the panels by using finishing nails and waterproof glue. Make sure you drill pocket holes at both ends of the trims and secure them to the legs by using 1 1/4″ screws.
Fitting the side trims
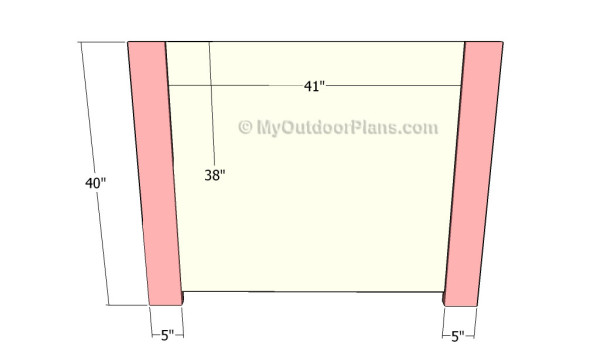
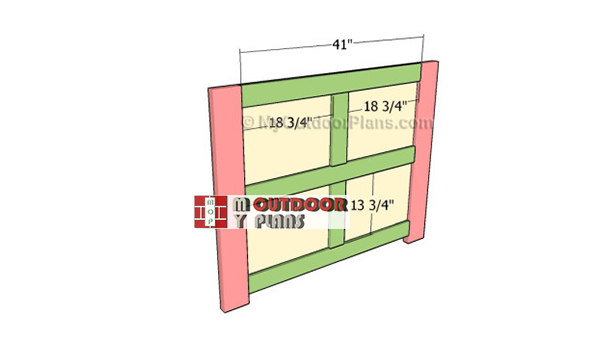
The next step of the woodworking project is to build the front face of the home bar. As you can easily notice in the diagram, we recommend you to build the legs out of 2×4 lumber and the panels out of 3/4″ plywood.
Top Tip: Drill pocket holes along the side edges and secure the panel to the vertical legs by using 1 1/4″ galvanized screws. Add glue to the joints and remove the excess by using a damp cloth.
Building-the-front-face-for-bar
Afterwards, attach the trims to the front face of the home bar, in order to enhance the look of the project. If you want to get a professional result, we recommend you to drill pocket holes at both ends of the 1×4 trims. Then lock them together and to the side legs by using 1 1/4″ galvanized screws.
Add glue to enhance the bond of the trims to the plywood panel and make sure there are no gaps between the components. In addition, smooth the surface with fine-grit sandpaper.
Building-the-top-frame-for-bar
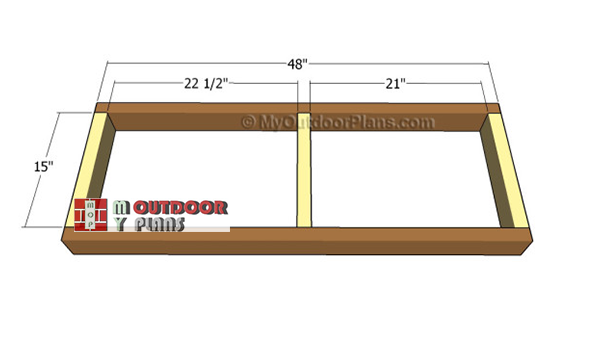
Building the frames for the home bar is a straight forward process, as you need to build the components out of 2×4 lumber. Mark the cut lines on the slats and adjust their size using a good circular saw.
Drill pocket holes at both ends of the short components and secure them to the rim joists by using 2 1/2″ galvanized screws. Add glue to the joints and make sure the corners are right-angled.
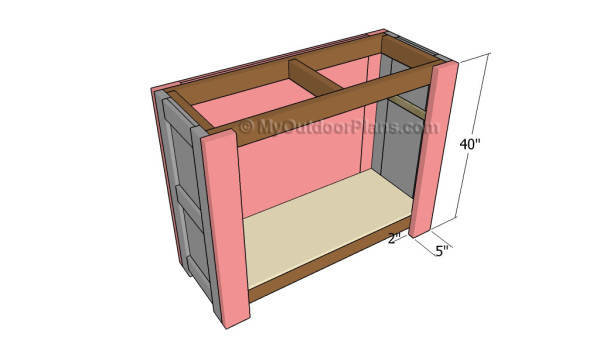
Assembling the bar
After building the frames and the panels for the home bar, we recommend you to assemble the structure together and tightly. As you can see in the diagram, you have to secure the panels to the frame. Use a spirit level to make sure the frames are horizontal and if the panels are vertical.
In addition, secure the adjacent panels together by inserting finishing nails through the legs into the perpendicular components. Add glue to the joints and remove the excess using a damp cloth.
Building the countertop
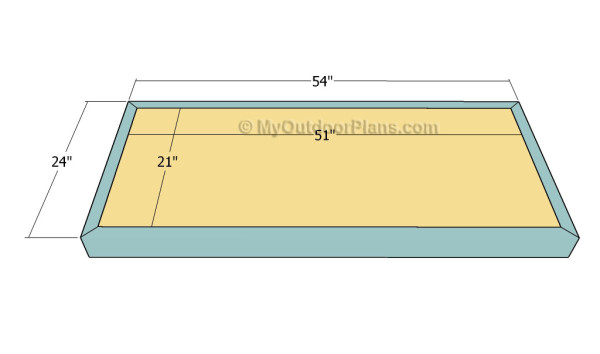
Building the tabletop for the bar is a straight-forward process, but you need to use the right woodworking techniques. Build the frame for the countertop out of 2×4 lumber. Cut both ends of the components at 45 degrees and lock them together by using 2 1/2″ screws and waterproof glue.
Clamp together two pieces of 3/4″ plywood and spread glue between the components. Drill pocket holes along the edges and secure it to the frame using 2 1/2″ screws. The edges should be flush.
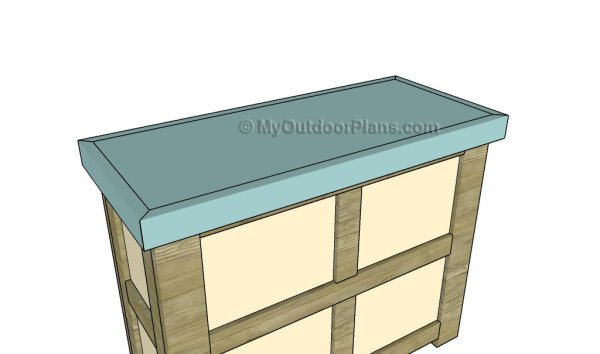
Fitting the countertop to the bar
Fit the countertop to the top of the bar, making sure the surface is perfectly horizontal. Drill pilot holes through the frame of the bar and insert 2 1/2″ screws through the panels into the top.
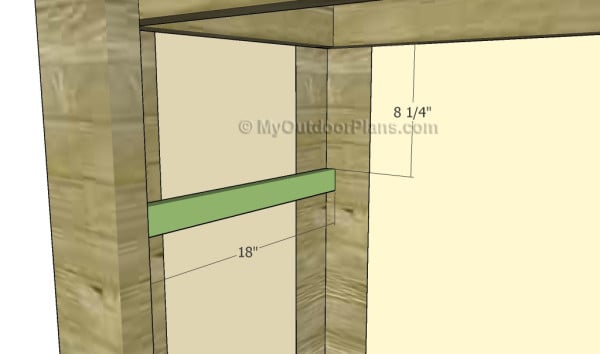
Fitting the inner cleats
Attach the 1×2 cleats to the interior faces of the home bar and secure them into place by using finishing nails or galvanized screws. Use a spirit level to check if the cleats are perfectly horizontal before securing them to the sides tightly. Adjust the height at which you place the cleats according to your needs.
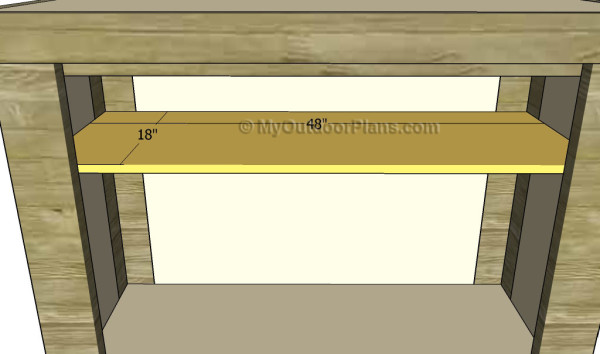
Fitting the shelf
Cut a piece of 3/4″ plywood at the dimensions described in the diagram and secure it to the cleats using 1 1/4″ screws. Make sure you leave no gaps between the components and check fit if the joints are perfectly rigid.
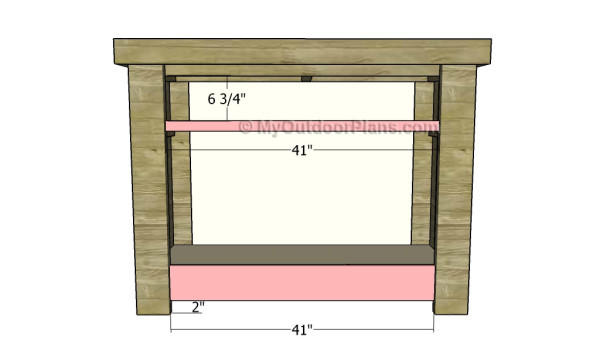
Fitting the trims
In order to get a professional result, we recommend you to attach decorative trims to the back face of the home bar. Therefore, we recommend you to build the top trim out of 1×2 lumber and the bottom trim out of 1×6 lumber.
Top Tip: Smooth the cut edges with sandpaper and drill pocket holes at both ends of the trims. Secure the trims to the legs by using 1 1/4″ galvanized screws.

How to build a home bar
One of the last steps of the woodworking project is to take care of the finishing touches. Therefore, fill the pilot holes with wood putty and smooth the surface with 120-grit sandpaper.
Top Tip: If you want to enhance the look of the woodworking project and to protect the bar from decay, we recommend you to cover the components with paint or stain. Place the bar in a proper location and move it whenever necessary.
This woodworking project was about how to build a home bar. If you want to see more outdoor plans, we recommend you to check out the rest of our step by step projects. LIKE us on Facebook and Google + to be the first that gets out latest projects.
EXPLORE MORE IDEAS FOR:
 |
 |
 |
 |