This step by step woodworking project is about wood garden gate plans. This small garden add value to your property and changes dramatically the look of your property. If you don’t want to build a white picket fence, but you still need to add character to the front path, you can build a small wooden gate and plank it with tall plants. Although our gate is about 4” wide, you can adjust its size as to fit your needs.
After choosing the design of the garden gate, you should buy the materials required for the project. Therefore, we recommend you to choose lumber designed for outdoor use, such as cedar, pine or redwood, making sure the slats are straight and in a good condition. Drill pilot holes in the components before inserting the wood screws, to prevent the components from splitting. Use a spirit level to plumb the posts, as well as the gate. See all my Premium Plans HERE.
Projects made from these plans
Cut & Shopping Lists
- A – 2 pieces of 4×4 lumber, 72” long POSTS
- B – 2 pieces of post caps for 4×4 lumber CAPS
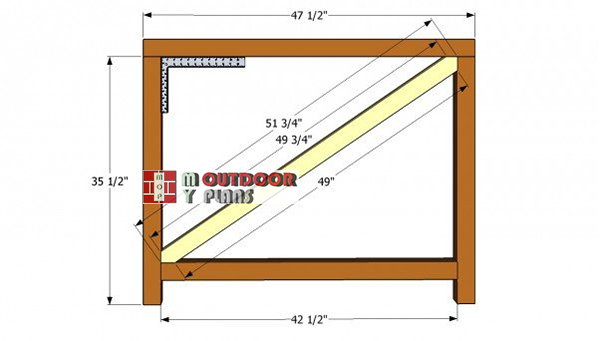
- C – 2 pieces of 2×3 – 35 1/2” long, 1 piece of 2×3 – 47 1/2” long FRAME
- C – 1 piece of 2×3 – 42 1/2” long, 2 piece of 2×3 – 52” long FRAME
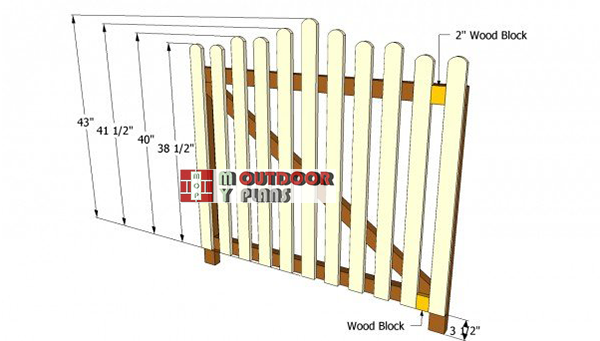
- D – 4 pieces of 1×3 – 38 1/2” long, 4 pieces of 1×3 – 40” long PALES
- D – 2 pieces of 1×3 lumber 41 1/2”, 1 pieces of 1×3 lumber 43” PALES
- E – 1 piece of 1×3 lumber – 47 1/2” long, 1 piece of 1×1 lumber – 47 1/2” long BOTTOM TRIMS
- F – 1 piece of 1×3 lumber – 47 1/2” long TOP TRIMS
Tools
![]() Hammer, Tape measure, Framing square
Hammer, Tape measure, Framing square
![]() Miter saw, Drill machinery, Screwdriver, Sander, Post-hole digger
Miter saw, Drill machinery, Screwdriver, Sander, Post-hole digger
Time
![]() One weekend
One weekend
Wood Gate Plans
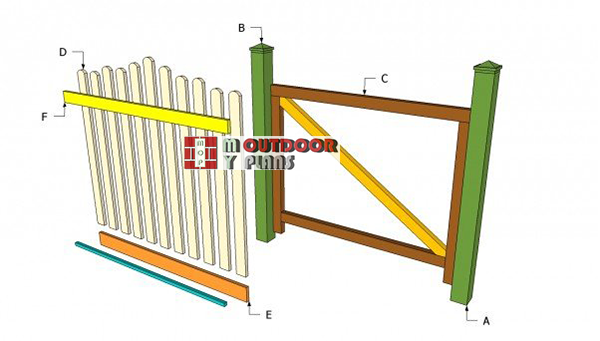
Wood-garden-gate-plans
Building a beautiful garden gate is a straight forward process, if you use the right plans and materials for your needs. There are many designs you can choose from, so you have to make sure the gate matches the design of you house and backyard constructions.
Top Tip: Round the top of the pales in order to enhance the look of the gate. In addition, place a 2” wood block between the slats, to make sure you obtain consistent gaps.
Garden Gate Plans

Anchoring the post into concrete
Install the wooden posts. Therefore you should choose from several alternatives, such as fitting the posts into concrete, pouring concrete footings or attaching a metal anchor to a concrete slab.
Each of these options has its advantages and disadvantages, therefore you have to choose the most convenient one for your needs. Nevertheless, in most of the cases, setting the posts in concrete will provide a proper support.

Installing the posts
In order to fit the posts into concrete, you need to dig 2-3′ deep holes. Compact a 3” thick layer of gravel, before fitting the posts. Use a spirit level to make sure the posts are perfectly plumb, before securing them several braces.
Place a straight edge on top of the posts and use a hand level, to check if they are at the same level. Pour the concrete and let it dry out for several days, before removing the braces.
Gate-frame-plans
Meanwhile, you should build the frame of the gate, using the components that can be seen in our free plans. Use a carpentry square to make sure the corners of the frame are right-angled.
Top Tip: In this project we show you how to build a 4” wide wood garden gate. Therefore, leave 48” between the wooden posts. Nevertheless, make the wood gate about 47 1/2” wide, in order to open properly.

Building the frame of the garden gate
Cut the components from 2×3 lumber and lock them together with 3” wood screws. Don’t forget to drill pilot holes trough the components, otherwise the wood might split. Add wood glue to enhance the bond of the joints.
In order to increase the rigidity of the frame, we recommend you to install a cross-brace, as in the image. Cut the ends of the brace, fit it inside the frame and lock it tightly with several wood screws.
Installing-the-palies
Place the frame on a perfectly level surface, before attaching the 1×3 pales. Cut the slats at the right size, using the dimensions from the image. Place a 2” wood block between the pales, in order to obtain even gaps between them.
Top Tip: Round the top of the pales, if you want to build a wood gate with an unique design. Drill pilot holes and drive in 2” screws, after countersinking their head.

Attaching the bottom trims
Building the bottom trims is a straight forward process, but it will most certainly enhance the look of the gate. Place the 1×4 wooden trim to the frame, below the pales and secure it with several 2” finish nails.
Afterwards, you can add character to the garden gate, by fitting a small 1×1 trims, just bellow the pales. Work with great care, if you want to obtain a professional result.

Installing the gate trim
In order to enhance the look of the gate, you should place a trim to the exterior face. Build the trim from 1×4 lumber and secure it into place with finish nails. Use a spirit level, to make sure the top trim will be perfectly horizontal.
Top Tip: If you want to get an unique design, we recommend you to round the exposed edges of the trims, using a router and a 1/4” bit.

Installing the hinges
On of the last step of the project is to secure the gate to the posts. Attach the hinges and secure them with screws. Pre-drill the lumber, to prevent the wood from splitting. Place the gate on wooden shims, about 2” above the ground. Make sure the gate opens properly, before attaching the hinges.
With the gate closed, position the stop on the post and secure it with screws. In addition, install the latch to the gate, making sure it is properly.

Garden gate plans
Last but not least, you have to take care of the finishing touches. Therefore, fill the holes and the cracks with wood filler and let it dry out for several hours, before sanding the surface with 120-grit sandpaper.
Top Tip: Protect the wooden components from rot by applying several coats of paint. Choose colors that match the design of the rest of your property, as to enhance the look of the shed.
This woodworking project was about garden gate plans. If you want to see more outdoor plans, we recommend you to check out the rest of our step by step projects.
EXPLORE MORE IDEAS FOR:
 |
 |
 |
 |
3 comments
How do I print the instructions for garden gate?
Please read the Faqs: http://myoutdoorplans.com/faq/
haven’t built it yet ,will comment later.
thanks for the gate plans.