This step by step diy project is about deck bench plans free. Building a simple deck bench is easy, if the right plans and woodworking techniques are used, as this project doesn’t require complex woodworking techniques. Nevertheless, proper planning is necessary, otherwise you might not be satisfied with the design or size of the wooden bench. If you want to build a simple deck seat, you should pay attention to this tutorial.
Choose quality lumber, if you want to get the job done as a professional and to enjoy the bench for many years in a row. Cedar, redwood or pine are great choices, as they combine the pleasant appearance with the durability. Always align the components at both ends before drilling pilot holes and inserting the galvanized screws. In addition, countersink the head of the screws, if you want to get a nice appearance.
Projects made from these plans
Cut & Shopping Lists
- A – 2 pieces of 4×4 lumber – 35″ long POSTS
- B – 2 pieces of 2×4 lumber – 55 1/2” long, 2 pieces of 2×6 lumber – 19” long FRAME
- C – 2 pieces of 2×6 lumber – 19” long, 2 pieces of 2×6 lumber – 58 1/2” long TRIMS
- D – 11 pieces of 2×2 lumber – 55 1/2” long SLATS
Tools
![]() Hammer, Tape measure, Framing square
Hammer, Tape measure, Framing square
![]() Miter saw, Drill machinery, Screwdriver, Sander
Miter saw, Drill machinery, Screwdriver, Sander
Time
![]() One day
One day
Related
[/tab][/tabs]
Building a deck bench
Building-a-deck-bench
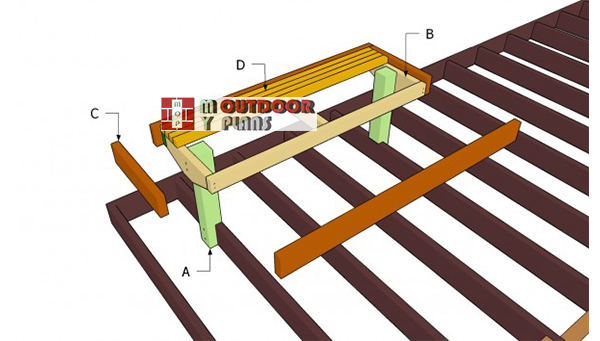
Top Top: There are many types of deck benches to choose from, so make sure you study the alternatives before taking a decision. In addition, you should always adjust the size and the shape of the bench, as to fit your needs and tastes.
Deck Bench Plans
Installing-the-posts
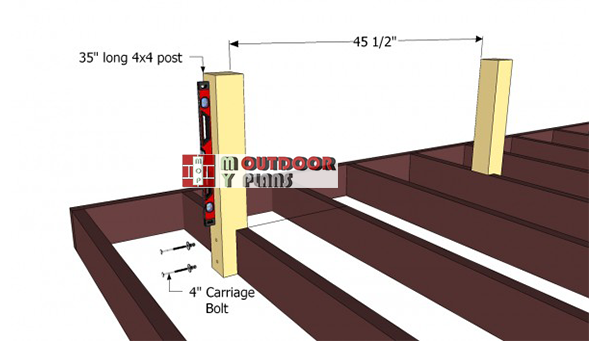
The first step of the project is to install the 4×4 posts to the deck framing. As you can see in the image, you need to notch the bottom of the posts, as to fit into place properly (cut 1 1/2” into the posts). Drill pilot holes both trough the posts and joists, before securing them into place with 4″ carriage bolts.
Plumb the posts with a spirit level, before driving in the bolts. The top of the posts should be level.
Installing-the-frame
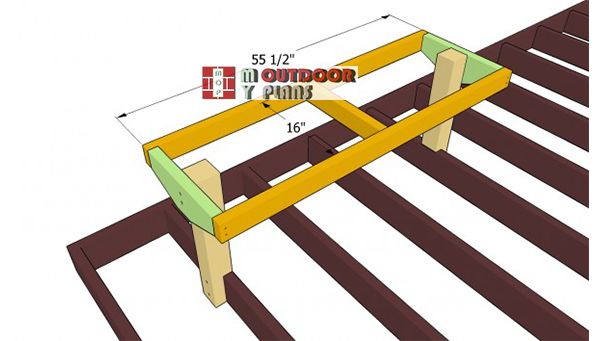
The next step of the project is to build the frame of the bench, as in the free plans. Build the side components from 2×6 lumber, while the front and back aprons should be made of 2×4 lumber. Fit a middle support, in order to enhance the rigidity of the structure.
Top Tip: Secure the frame to the legs with 3” wood screws, after drilling pilot holes. In addition, make sure the frame is perfectly horizontal.

Installing the trims
Although this step is not compulsory, we strongly recommend you to fit trims to the bench frame, in order to get a professional result. Cut the 2×6 lumber at the right size and attach them to the frame of the bench.
Top Tip: Make sure the top edges of the trims are 1 1/2” above the framing. In this manner, we will be able to fit the 2×2 slats for the seating (they have to be at the same level with the frame).

Installing the slats
The next step of the project is to install the seat slats. As you can see in the image, you need to install 1 1/2” thick slats, either we speak of 2×2, 2×4 or even 2×6 lumber. You should select the size of the slats according to your needs, making sure the design of the bench fits the style of the deck.
Drill pilot holes trough the slats and secure them to the frame with 2 1/2” galvanized nails. Don’t forget to counter sink the head of the screws.

Deck bench plans
Last but not least, there are a few finishing touches you have to take care of. Therefore, we strongly recommend you to fill the holes with wood filler and let the compound to dry out for several hours. Smooth the surface with 120-grit sandpaper and vacuum the residues.
Top Tip: Apply a few coats of stain or paint, to protect the wooden components from decay. In addition, you should choose a proper color that matches the deck style.
This project was about ground level deck plans. If you want to see more outdoor plans, we recommend you to check out the rest of the projects. Don’t forget to share our projects with your friends, by using the social media widgets.
EXPLORE MORE IDEAS FOR:
 |
 |
 |
 |