DIY Kitchen Pantry
From Bren,
This project started just after Christmas when my mother said she would like a pantry under her kitchen window. She has a fairly small kitchen so good storage space is at a premium. I was thinking ahead and figured I could get something done by Mother’s Day. I started looking online for a small pantry plan and came across: http://woodworking.formeremortals.net/2015/10/space-saving-pantry-made-from-one-sheet-of-plywood/
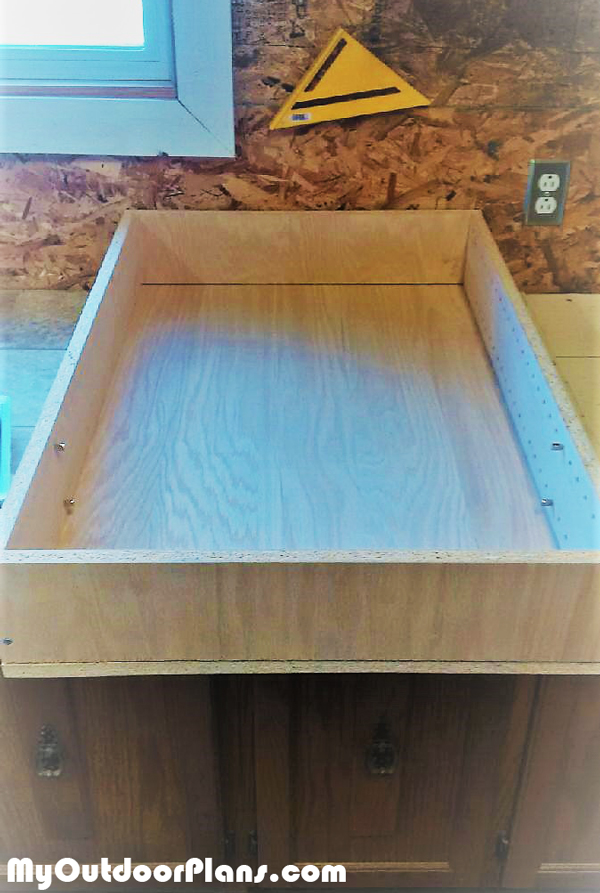
I really liked the idea of making a small pantry from one sheet of plywood, since space was at a premium at my mother’s house and I wanted to try and keep the size down. I figured worst case scenario I would be out of pocket for a sheet of plywood. I bought a sheet of oak plywood (which was actually OSB) and had it cut into quarters at Home Depot. I figured I could manage all the cuts from that and I had a few leftover pieces at home from my TV tray project.
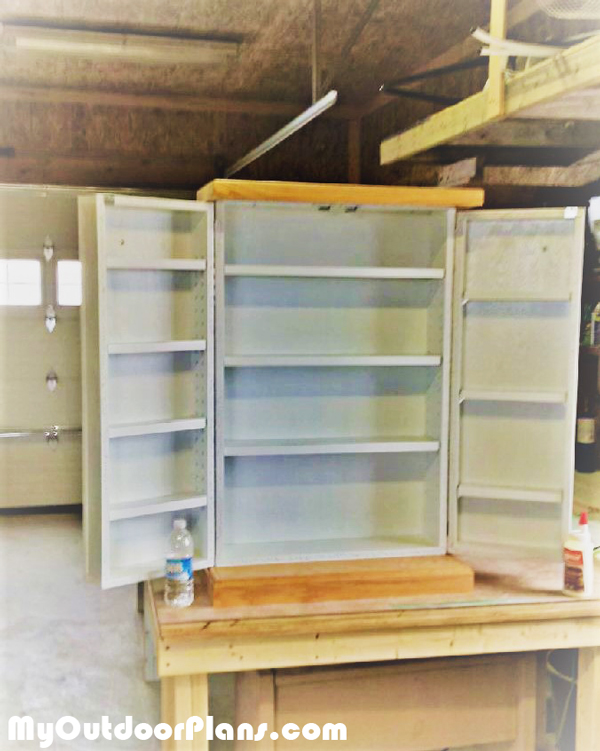
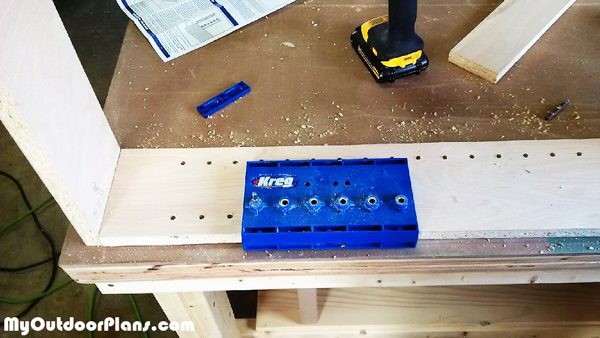
The first challenge was getting nice straight cuts with my table saw. I have a small Master craft table saw and it does not lend itself to arrow straight cuts. I did manage to get all the pieces cut using the extra prices I had available, but there is no way I could manage it all with just one sheet. If you are making this project you really want 1 ½ sheets in case you make any mis-cuts and to account for wastage. If you can fit a full sheet in your vehicle you may be able to pull it off by doing all cuts at home. The next step in the plan was to screw together the frames and drill shelf peg holes. You could go with fixed shelves and use pocket screws but I was in deep at this point so I figured I’d go see how much a Kreg shelf hole jig would set me back, since the pocket hole jig I have works like a charm. Turns out it is about $50 for the jig which seemed really overpriced but I bought one any way. It works great though and hopefully I’ll use it for some future projects.
The adjustable shelves are impressive. At this point I had the frames built and attached the backs using glue and 1 1/2” wood screws. The plans call for brad nailing but I don’t yet have a decent nail gun. The bottom base and top use solid oak trim with a mitre cut for the corners. You need to be really careful with the mitre cuts to ensure tight corner joints. I had to go rebuy one piece…. Cut one piece too short by about ¼” and I thought it looked pretty bad.
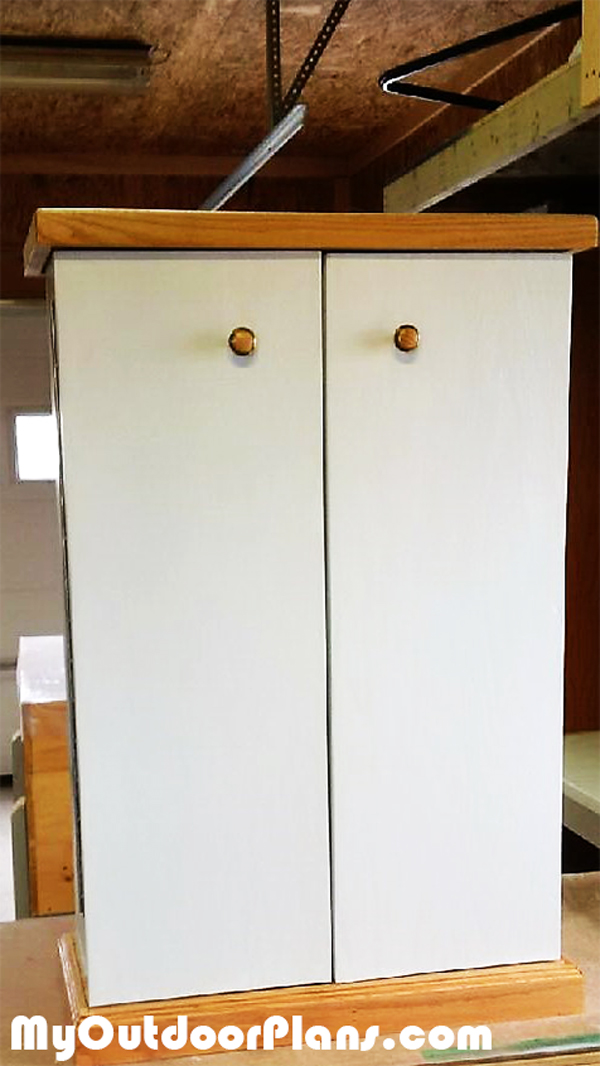
Once I had the top and bottom assembled I used the router to add some nice finishes as per the plan. Now came the moment of truth, connecting the doors to the frame. I laboured over this for a week or so, considering all my hinge options. The plan called for a piano hinge but I was hoping to use something that looked a bit nicer. When I sized it all up, regular cabinet hinges would not work since the doors had shelves so there was no flat surface for the cabinet hinge to hang from. I also considered regular hinges but considering the weight of the doors and need for careful alignment I went with the piano hinge. The piano (continuous) hinge went on well, although one door ended up slightly higher than the other probably due to the frame and back of one door not being perfectly aligned… lesson learned.
I should mention I painted the cabinet and doors with two coats of winter white and 2 coats of water based poly. I sampled the oil based poly over the paint but it yellowed the paint whereas the water based did not. Since this was an indoor project the water based was fine, and it does not put off any fumes like the oil based does. The only downside with the water based is you need to fix any overrun quickly because it dries very fast. I’ll also note you need to lightly sand the first coat of paint with 220 sandpaper to ensure a smooth finish, a light sanding makes a big difference.
For the top and base I applied 2 coats of oil based poly with a light sanding after both coats once dry. I didn’t think stain was necessary since I wanted the oak look to shine through. After all the paint and poly I installed the doors then moved onto attaching the base and the top. I was a bit nervous about screwing on the top since a screw coming through the top or splitting would look terrible. I made sure my drill bit for the pilot holes was adjusted to exactly 1 ¼” so the 1 ¼” screws would go in with minimal risk of splitting.
There was no gluing of the top or bottom in the plan so you need to ensure the screws hold as much as possible since they are the only thing keeping this very heavy cabinet top and bottom in place. Keep in mind the doors are swinging freely so the cabinet is only attached to half of the top and bottom. Next I had to decide on door knob hardware and a magnetic catch for the doors. I went with a basic door catch, the only concern was having it hang down enough to have good contact with the door but a double catch worked out fine. I decided on the oak and silver knob to match the base and top and piano hinge.
For the shelves I bought some snap on ¾” white laminate for the fronts, it was easy to install and very forgiving, it was surprisingly cheap at $2 for an 8’ piece. The other option was the iron on white trim but I decided to use that only where necessary like the outside end bits where the trim would not snap on. The shelf pins fit nicely into the holes I cut with the jig, but the shelves themselves did need some double-sided tape to ensure they didn’t come flying out when the door was opened.
What started out as an easy to make pantry from one sheet of plywood ended up being a LOT of work. I’d say it took me about 20 hours in total with all the cutting, attaching, sanding, painting, and finishing. It also ended up costing close to if not over $300: $60 for plywood, $50 for hinges, $40 for paint and poly, $30 for door hardware, $50 for shelf pin jig, $40 for oak trim, and a few extras. But in the end it turned out really nice and I hope it ends up being an awesome mothers day gift! If she doesn’t like it I’ll keep it for myself……
EXPLORE MORE IDEAS FOR:
 |
 |
 |
 |