This step by step woodworking project is about free chicken coop plans. Building a wooden chicken coop is a nice weekend project, especially if you want to protect the chickens from bad weather. Work with attention and with good judgement, as you need to plan everything from the very beginning, otherwise the coop might not be large enough for your needs. Buying the right materials is also important, if you want to get the job done as a professional.
If you want to have an easy access to the nests, you could install several small doors ti the back of the chicken coop. In addition, if you want to keep the expenditures under control, you should try to use simple techniques and solutions. Align the components at both ends before driving in the screws, and pre-drill the lumber, if you want to get durable and rigid joints. See all my Premium Plans HERE.
PART 1: Free Chicken Coop
PART 2: How to Build a Nesting Box
Projects made from these plans
Free Chicken Coop Plans
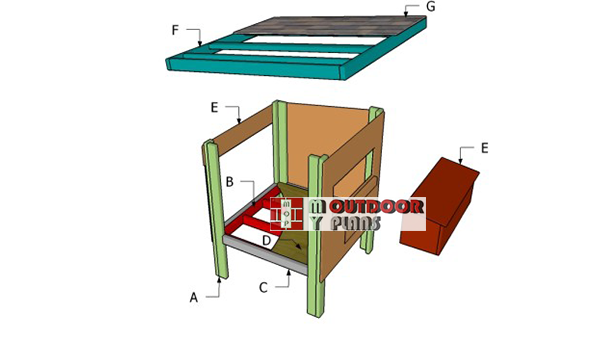
Building-a-chicken-coop
Cut & Shopping Lists
- A – 4 pieces of 2×4 lumber – 62 1/2″ long, 4 pieces – 68″ long LEGS
- B – 4 pices of 2×4 lumber – 42″ long, 2 pieces – 45″ long FRAME
- C – 2 pieces of 2×4 lumber – 38″ long, 2 pieces – 41″ long TRIMS
- D – 1 piece of 3/4” plywood – 45″x45” long FLOOR
- E – 3 pieces of 3/4″ plywood – 48″x48″ long, 1 piece – 8″x49 1/2″ long WALLS
- F – 6 pieces of 2×4 lumber – 61″ long, 2 pieces of 2×4 lumber – 64″ long RAFTERS
- G – 17 pieces of 1×6 lumber – 64″ long ROOFING
- 3 pieces of 3/4″ plywood – 4’x8′
- 21 pieces of 2×4 lumber – 8 ft
- 9 pieces of 1×6 lumber – 12 ft
- 2 1/2″ screws
- 1 5/8″ screws
- 1 1/4″ screws
- wood filler
- wood glue
- stain/paint
Tools
![]() Hammer, Tape measure, Framing square
Hammer, Tape measure, Framing square
![]() Miter saw, Drill machinery, Screwdriver, Sander
Miter saw, Drill machinery, Screwdriver, Sander
Time
![]() One day
One day
Related
Building a chicken coop
Building-the-chicken-coop-frame
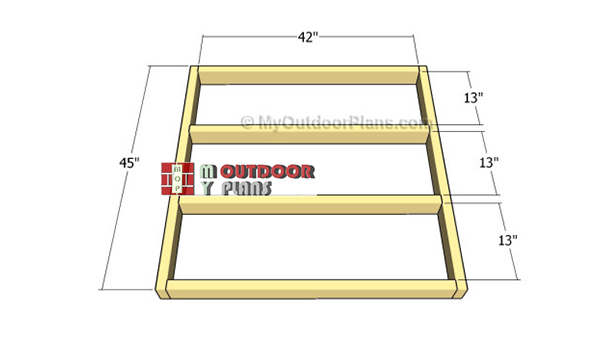
The first step of the woodworking project is to build the frame of the chicken coop. In order to get a professional result, we recommend you to take accurate measurements and to cut the components out of 2×4 lumber.
Drill pilot holes through the rim joists and insert 2 1/2″ screws into the regular joists. Make sure the corners are right-angled and add glue to enhance the rigidity of the structure.

Attaching-the-legs-to-the-floor-frame
Continue the woodworking project by fitting the 2×4 legs to the frame of the chicken coop. Drill pilot holes through the legs and insert 2 1/2″ screws into the frame. It is essential to plumb the legs with a spirit level and to check if the frame is horizontal.
Leave no gaps between the components and make sure the joints are rigid and durable. Lock the adjacent legs together tightly by inserting 2 1/2″ galvanized screws every 10″.

Fitting the frame
Attach 2×4 trims to the chicken coop, as described in the diagram. Make sure there are 3/4″ between the top of the trims and the frame of the chicken coop.

Fitting the floor
Cut the floor of the chicken coop out of 3/4″ plywood and fit it inside the frame. Make sure there are no gaps between the components and secure the plywood floor into place by using 1 1/4″ galvanized screws.

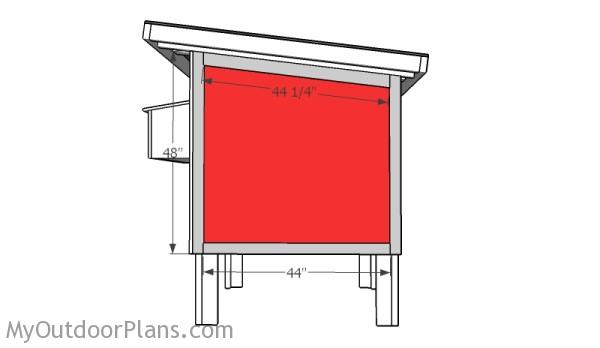
Building the side walls
Building the sides of the chicken coop is a straight forward process, but you need to use the proper materials and to take accurate measurements. Mark the cut lines on the plywood pieces and get the job done using a circular saw.
Smooth the edges and attach the sheets to the frame of the chicken coop. Drill pilot holes through the sheets and secure them into place by inserting 1 14″ screws.

Fitting the back face
Continue the garden project in the same manner described above, but paying attention to the instructions described in the image. Mark the cut lines on the front face and get the job done with a good jig saw.
Top Tip:Cut the bottom door and lock it into place by using several metal hinges. Cut out the opening for the nesting box, making sure you smooth the edges with sandpaper.

Building the front face
Attach a piece of 3/4″ plywood to the top of the front face of the chicken coop. Afterwards, fit chicken coop wire to the front face in order to get the job done in a professional manner.
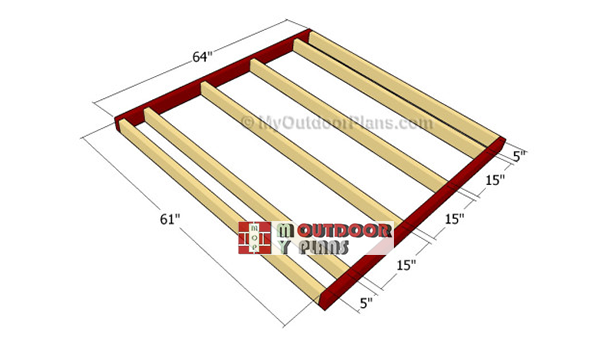
Building-the-roof-of-the-coop
The next step of the project is to build the frame of the chicken coop. In order to get the job done in a professional manner, we recommend you to cut both ends of the rafters at 90 degrees, by using a proper miter saw.
Place the rafters spaced as described in the diagram and drill pilot holes through the perimeter components. Insert 2 1/2″ screws into the rafters and leave no gaps between the components.

Fitting the roof
Attach the roofing frame to the structure and lock it to the legs by using galvanized screws. Drill pilot holes through the top of the legs and insert 2 1/2″ screws into the frame of the roof. Leave no gaps between the components and check if the joints are rigid and durable.

Fitting the roofing slats
In order to protect the construction from bad weather, we recommend you to attach 1×6 slats to the roofing structure. Install the slats from the bottom of the roof to the top. Secure the slats into place by inserting 1 1/4″ screws. Make sure the slats overlap at least 1″.
Front trims
Fit the 1×3 trims to the front of the coop. Use brad nails to lock the trims into place. This step is optional.
Side trims
Fit the trims to the sides of the coop.
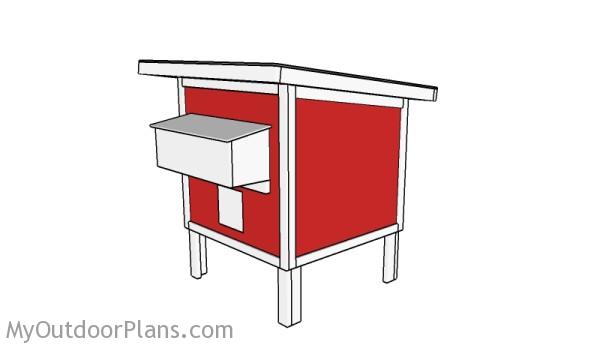
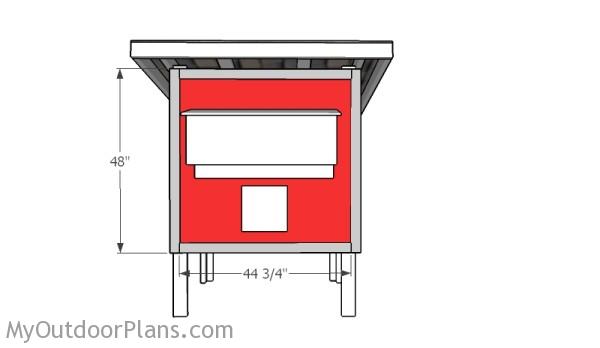
Free chicken coop plans
Last but not least, you should take care of the final touches. Therefore, take a look over the rest of the woodworking project. Make sure the nails are inserted properly, otherwise the chickens could easily injure. Smooth the sharp edges.
Top Tip: If you have followed the instructions and used quality materials, the chicken coop should be similar to the one in the image.
This article was about free chicken coop plans. If you want to see more outdoor plans, we recommend you to check out the rest of our projects. LIKE us on Facebook to be the first that gets our latest updates and submit pictures with your DIY projects.

EXPLORE MORE IDEAS FOR:
 |
 |
 |
 |
4 comments
Would it be possible to show the plans for making this coop into a 4 x 8 chicken coop? Thanks.
No, I wouldn’t be possible to scale this project, but I have 4×8 shed chicken coop plans here: http://myoutdoorplans.com/animals/small-chicken-coop-plans/ I hope you will find them useful.
Hello there! How many standard size hens do you think this coop can accommodate? Thanks!
5-6 chickens